HowTo: Allow-List in Barracuda

21st June 2025 | HowTo, MSP, Technology HowTo: Allow-List in Barracuda

If you’re utilizing Barracuda’s Email Security Gateway, you can white-list CyberHoot IP Addresses and Domain Name to allow our simulated phishing test emails and training notifications to get through to your end-user’s inboxes.

Please see this article for the current IP Addresses and Domain Names for CyberHoot.

CyberHoot Email-Relay IP Addresses, Domains, and White-Listing Articles

White-listing by IP in Barracuda in Email Security Gateway

These instructions were gathered and summarized–based on Barracuda’s knowledgebase. For more information on how to white-list in Barracuda, check out this video from Barracuda.

If you are using Barracuda’s Email Security Service (cloud), follow these steps to white-list Barracuda by IP address:

  1. Log in to your Barracuda Cloud Control.
  2. Go to Email Security > Inbound Settings > IP Address Policies.
  3. In the IP Blocking / Exemption section,  enter the first CyberHoot mail server IP in the IP/Network Address field.
  4. In the Netmask field, type the netmask using this format:  255.255.255.255.
  5. If you’d like, add a note in the Comment field. For example, CyberHoot Simulated Phishing IP Address.
  6. Click Add to white-list the IP address.
  7. Complete steps 2 through 6 for each of the CyberHoot IP addresses found above.

If you are using Barracuda’s Email Security Gateway (on-premises), follow these steps to white-list Barracuda by IP address:

  1. Log in to your Barracuda Email Security Gateway web interface.
  2. Go to the BLOCK/ACCEPT > IP Filters page.
  3. In the Allowed IP/Range section, enter the first CyberHoot mail server IP in the IP/Network Address field.
  4. In the Netmask field, type the netmask using this format:  255.255.255.255
  5. If you’d like, add a note in the Comment field. For example, CyberHoot Simulated Phishing IP Address.
  6. Click Add to white-list the IP address.
  7. Complete steps 2 through 6 for each of the CyberHoot IP addresses found above.

Barracuda Intent Analysis

You may need to white-list us in Barracuda’s Intent Analysis feature to prevent the URLs in simulated phishing tests from being altered, and potentially resulting in skewed phishing test results. See this article from Barracuda explaining this process

If you are using Barracuda’s Email Security Service (cloud), follow these steps to white-list Barracuda’s Intent Analysis:

  1. Log in to your Barracuda Cloud Control.
  2. Navigate to Email Security > Inbound Settings > Anti-Phishing.
  3. Under the Intent section, add CyberHoot’s hostnames. Make sure the Policy drop-down is set to Ignore.

If you are using Barracuda’s Email Security Gateway (on-premises), follow these steps to white-list Barracuda’s Intent Analysis:

  1. Log in to your Barracuda Email Security Gateway web interface.
  2. Navigate to Email Security Gateway > Basic > Spam Checking.
  3. Under the Intent Analysis section, add CyberHoot’s hostnames to the URI Exemptions: text box field.

Barracuda Advanced Threat Protection (ATP)

If you are using Barracuda’s Advanced Threat Protection (ATP) and have experienced false clicks or false attachment opens, you can set up exemptions. Setting up exemptions allows you to bypass PDF scanning for phishing test emails from CyberHoot’s IP addresses.

To set up exemption addresses to bypass ATP PDF Scanning:

  1. Log in to your Barracuda Email Security Gateway web interface.
  2. Select the ATP Settings tab.
  3. Enter the above CyberHoot IP address(es) and subnet mask(s) at the beginning of this How To article.
  4. Click Add.


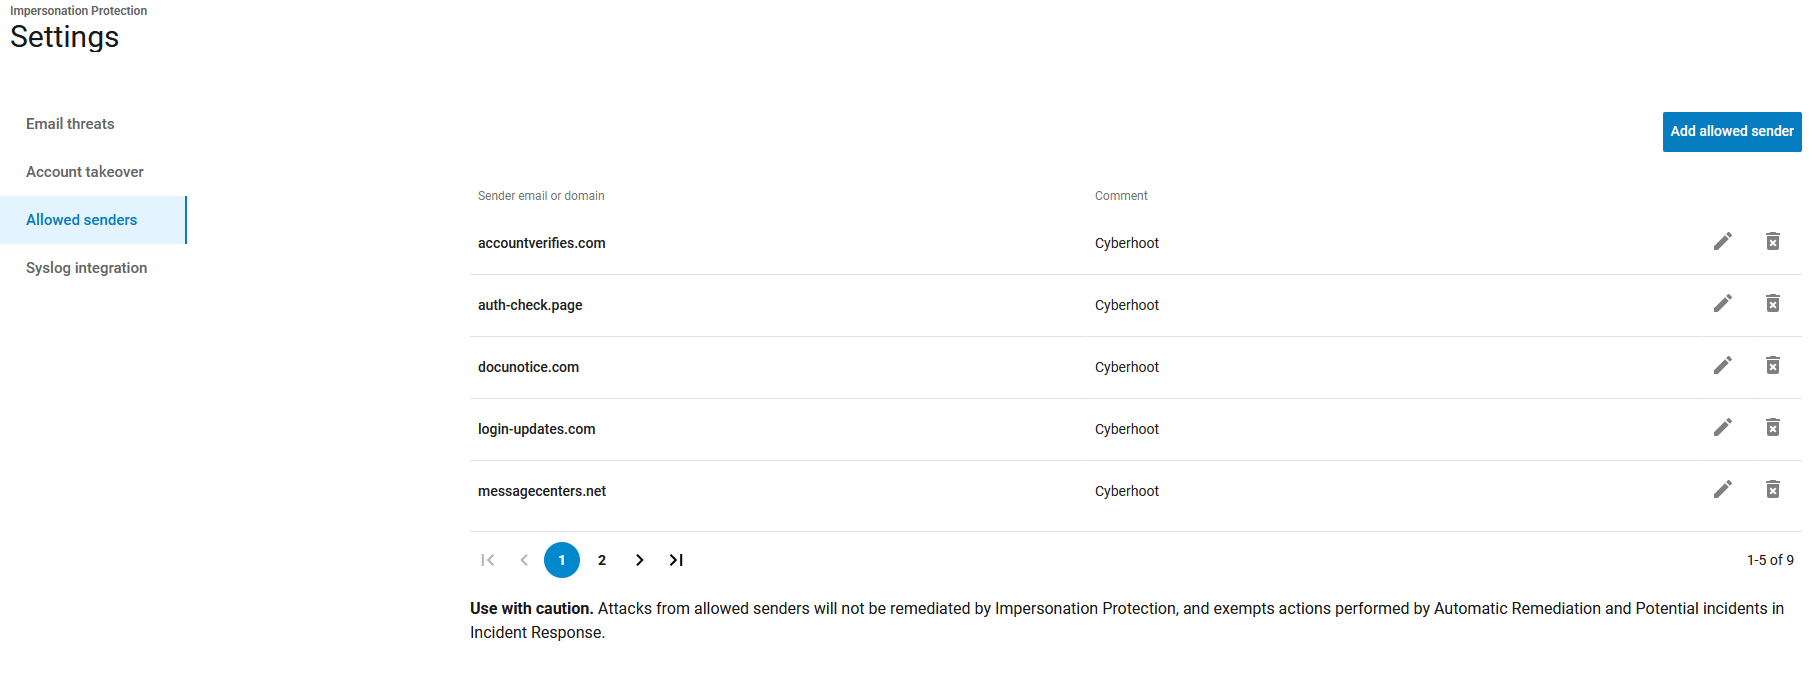
Barracuda Impersonation Protection: Allowed Senders

If your organization uses Barracuda’s Impersonation Protection feature, you will need to add CyberHoot’s sending domains to the Allowed Senders list. This prevents simulated phishing emails and training notifications from being blocked or flagged by Impersonation Protection.

To add CyberHoot domains as allowed senders:

  1. Log in to your Barracuda Cloud Control or Email Security Gateway web interface.
  2. Navigate to Impersonation Protection > Settings > Allowed Senders.
  3. Click the Add allowed sender button in the top right corner.
  4. Enter each CyberHoot domain (find them here) in the Sender email or domain field.
  5. In the Comment field, enter “CyberHoot” to identify the entry.
  6. Click Save or Add to confirm each entry.
  7. Repeat for all CyberHoot domains listed in the IP Addresses and Domain Names article above.

Note: Use with caution. Domains added to the Allowed Senders list will not be remediated by Impersonation Protection, and their actions are exempted from Automatic Remediation and Potential Incidents in Incident Response.

The screenshot below shows the Allowed Senders settings page with CyberHoot domains already added:
Latest Blogs

Stay sharp with the latest security insights

Discover and share the latest cybersecurity trends, tips and best practices – alongside new threats to watch out for.

The Ransomware an AI Model Built Without Trying

The Ransomware an AI Model Built Without Trying

Researchers went looking for a fake photo upscaler and found something stranger: a ransomware kit an AI model...

Read more
CyberHoot Goes Fully Passwordless: Native Passkey Support Arrives for Administrators

CyberHoot Goes Fully Passwordless: Native Passkey Support Arrives for Administrators

For four years, CyberHoot has argued the same thing on its blog: passwords are major weak link. They get reused,...

Read more
Don’t Score an Own Goal: Outsmart World Cup 2026 Scams

Don’t Score an Own Goal: Outsmart World Cup 2026 Scams

The 2026 FIFA World Cup kicked off on June 11th across the United States, Canada, and Mexico. Six million fans...

Read more